Are you ready to dive into the exciting world of Roblox shirt creation and elevate your avatar's style or even build a virtual fashion empire? This comprehensive guide is designed to help you navigate every step of the Roblox shirt setup process. We're talking about everything from designing your very first pixel masterpiece using the official template to understanding the nitty-gritty details of uploading your creations to the platform. You'll learn about the requirements, the Robux costs involved, and how to successfully list your shirts for sale in the Avatar Shop. Whether you're a complete beginner looking for a simple walk-through or someone who's hit a snag and needs to troubleshoot a pending shirt, this resource has got you covered. Discover practical tips, essential tools, and answers to all your burning questions about making, uploading, and profiting from custom Roblox clothing. Let's get your designs out there!
Latest Most Asked about Roblox Shirt SetupWelcome to the ultimate living FAQ about Roblox shirt setup, updated for the latest patches and creator tools! Whether you're a budding designer or an experienced creator looking for specific answers, this section covers everything you need to know. We've gathered the most popular questions from across the web, including those often seen in Google's "People Also Ask" box, to provide clear, concise, and actionable answers. From initial design steps to advanced selling tips and troubleshooting common issues, consider this your go-to resource for mastering custom Roblox clothing. Let's dive into these frequently asked questions to help you elevate your Roblox creation game!
Beginner Questions about Roblox Shirt Creation
How do I make a shirt on Roblox 2024?
To make a shirt on Roblox in 2024, you'll need to download the official Roblox shirt template, design your clothing on it using an image editor like GIMP or Photoshop, and then upload the finished PNG file to the Roblox Creator Dashboard. Ensure your design adheres to the specified dimensions of 585x559 pixels and has a transparent background. There is a small Robux fee for uploading each item.
Is it free to make shirts on Roblox?
No, it is not entirely free to make shirts on Roblox. While the design software you use can be free (like GIMP or Photopea), there is a mandatory upload fee of 10 Robux for each shirt or pant you create and upload to the platform. This fee helps cover moderation costs and infrastructure.
What software do I need to design Roblox shirts?
You need image editing software capable of handling transparent PNG files to design Roblox shirts. Popular choices include free options like GIMP, Photopea, or Krita. Professional designers often use Adobe Photoshop or Illustrator for more advanced features. The key is to find software you are comfortable using to manipulate the template.
Designing Your Roblox Clothing
Where can I find the official Roblox shirt template?
The official Roblox shirt template can be found on the Roblox Developer Hub or by performing a simple web search for "Roblox shirt template." It's typically a transparent PNG image that provides the precise layout for the front, back, and sleeves of your shirt, ensuring correct mapping onto the 3D avatar model.
What are the dimensions for a Roblox shirt image?
The required dimensions for a Roblox shirt image are strictly 585 pixels wide by 559 pixels tall. It's crucial that your final PNG file matches these exact dimensions, otherwise, the upload process will likely fail or result in a distorted appearance on the avatar. Always double-check your image size before saving.
How do I ensure my Roblox shirt has a transparent background?
To ensure your Roblox shirt has a transparent background, you must save your final design as a PNG file and select the option to preserve transparency during the saving process in your image editing software. Transparent areas on the template, where the avatar's skin should show, must remain transparent in your design. This makes your shirt look natural on the avatar.
Uploading and Moderation Process
How long does it take for a Roblox shirt to be approved?
The approval time for a Roblox shirt can vary. Typically, it takes a few hours to a day for moderation to complete. However, during peak times or if your design requires a manual review, it might take up to several days. You can check the status in your Creator Dashboard.
Why is my Roblox shirt stuck on pending?
If your Roblox shirt is stuck on pending, it usually means it's still undergoing the moderation process. This could be due to a high volume of uploads, or it might have been flagged for manual review if the system detected something potentially ambiguous in the design. Ensure your design complies with all Roblox Community Standards; sometimes re-uploading can help resolve persistent issues.
Selling and Earning Robux
How much Robux can I earn from selling Roblox shirts?
The amount of Robux you can earn from selling Roblox shirts depends on your set price and the number of sales. Roblox takes a 70% commission from each sale if you're a Premium user, meaning you receive 30% of the sale price. Without Premium, the commission structure is different. Pricing your items competitively and designing appealing shirts are key to maximizing earnings.
Can I sell Roblox shirts if I don't have Premium?
Yes, you can still sell Roblox shirts even if you don't have a Premium subscription. However, the commission structure will be less favorable. Premium subscribers typically receive a higher percentage of the Robux from sales compared to non-Premium users. Many creators find it beneficial to have Premium for better earning potential.
Troubleshooting Common Issues
My Roblox shirt upload failed. What should I do?
If your Roblox shirt upload failed, first verify that your image dimensions are exactly 585x559 pixels and that it's saved as a transparent PNG file. Incorrect dimensions or file format are the most common reasons for upload failures. Also, check your internet connection and ensure you have enough Robux for the upload fee.
How do I fix a Roblox shirt with white boxes on the avatar?
To fix a Roblox shirt appearing with white boxes on the avatar instead of being transparent, you need to re-edit your design and ensure the background areas are truly transparent. When saving, explicitly select the option to "Save as PNG" and confirm that "transparency" is enabled or preserved in your image editor. This issue indicates your file didn't retain its alpha channel.
Still have questions? Check the Roblox Creator Hub for more in-depth guides!
So, you've been thinking about creating your own custom shirts for your avatar or even selling them to other players, right? Honestly, a lot of people ask, "How do I actually get my designs onto a Roblox shirt?" It might seem a little daunting at first, but I promise you, it's totally doable and can be a lot of fun. I've been through the process myself, and I can tell you that with the right guide, you'll be designing and uploading your apparel in no time.
Building your brand or just styling your character in unique ways really starts here. You'll need to get familiar with a few key steps to make sure your creations look great and function correctly within the Roblox universe. It's all about understanding the template, getting your image right, and then navigating the upload system. Don't worry, we'll break it all down simply.
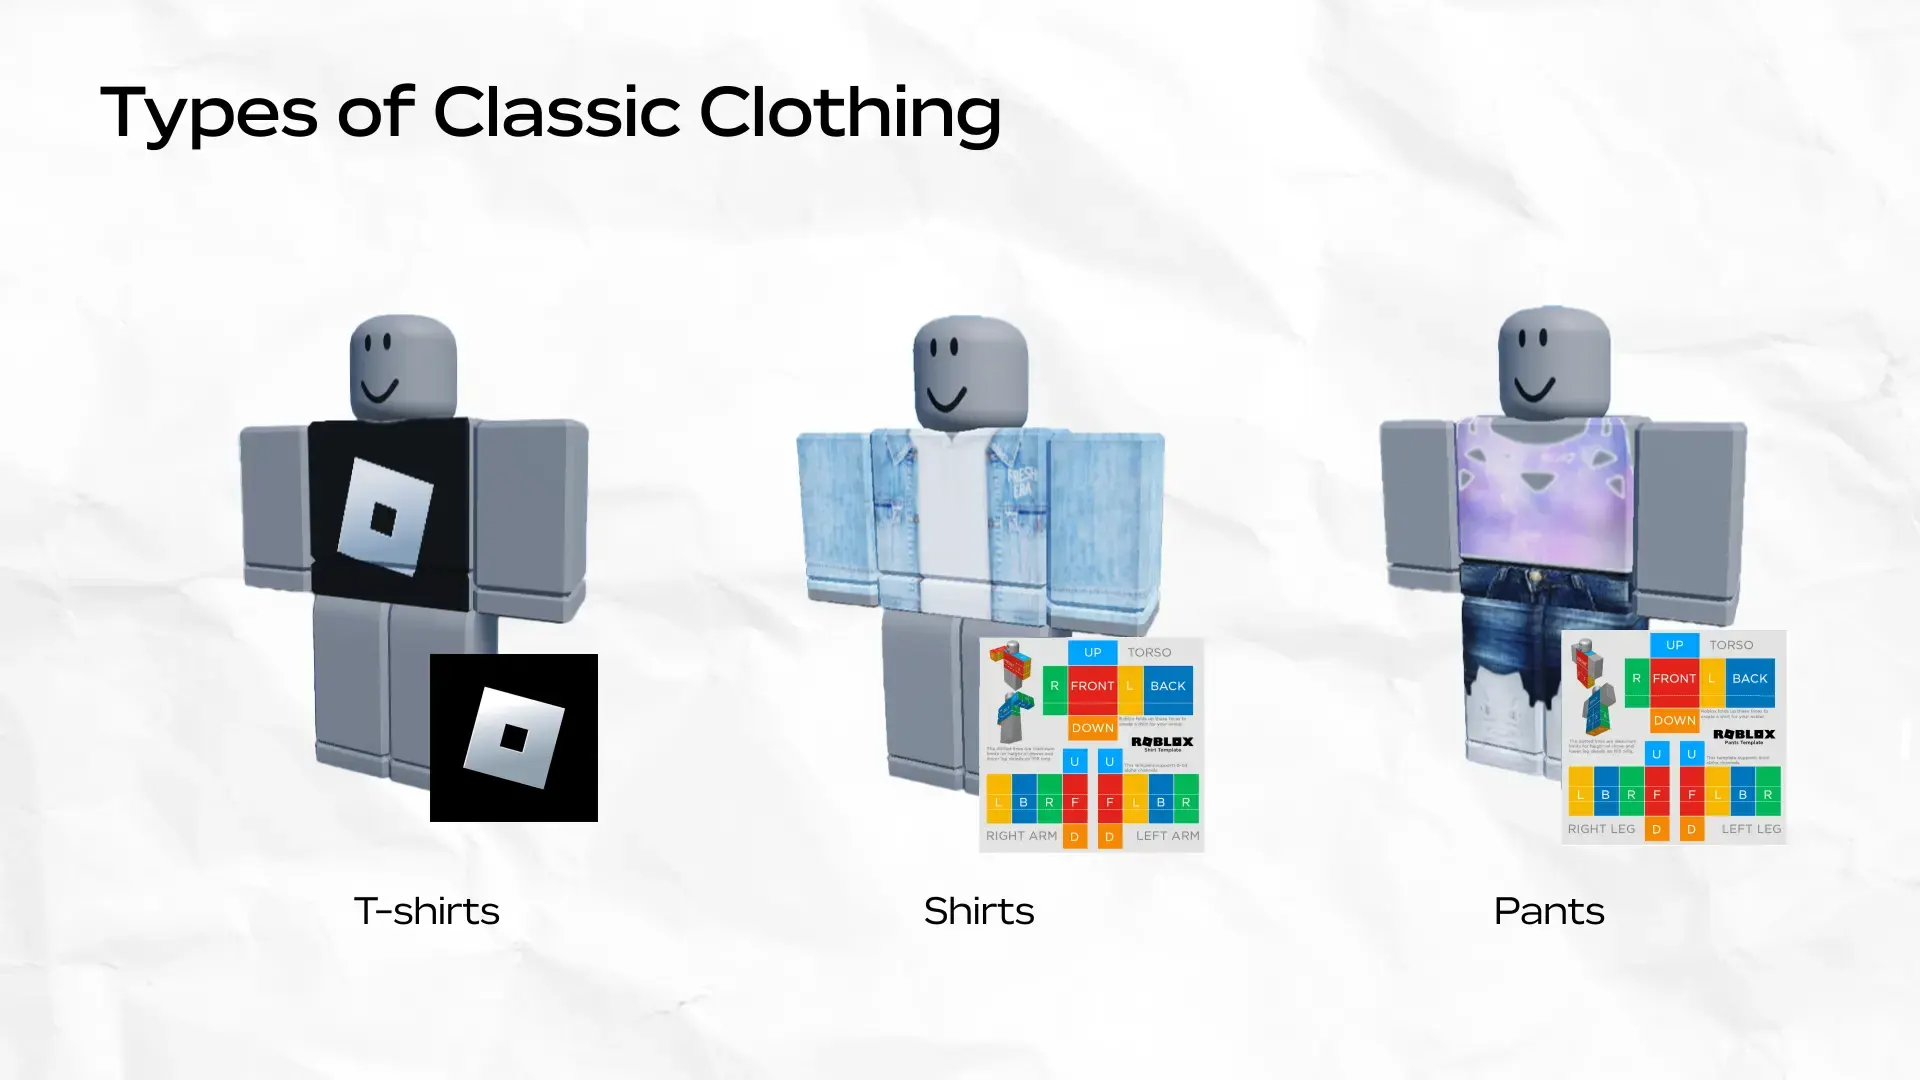
What Exactly Is a Roblox Shirt Setup?
When we talk about Roblox shirt setup, we're referring to the entire process of bringing a custom piece of clothing into the game. This isn't just about drawing something; it involves a specific template, image requirements, and platform rules. It's essentially the pipeline from your creative idea to a wearable item in the Avatar Shop.
It covers everything from downloading the official template to finally setting a price for your item if you plan to sell it. Understanding these components is crucial for anyone looking to make their mark in Roblox fashion. You'll want to ensure every step is followed correctly to avoid any issues.
Getting Started with Your Design
The very first hurdle, or maybe the most exciting part, is actually creating your shirt's visual design. You'll need some basic graphic design skills or at least a good eye for what looks good on an avatar. This is where your creativity truly shines, but it has to fit within Roblox's structure.
I've tried different approaches myself, and honestly, having a clear vision before you even open your design software helps immensely. Think about colors, patterns, and any specific graphics you want to include. This planning stage really sets the foundation for a successful shirt.
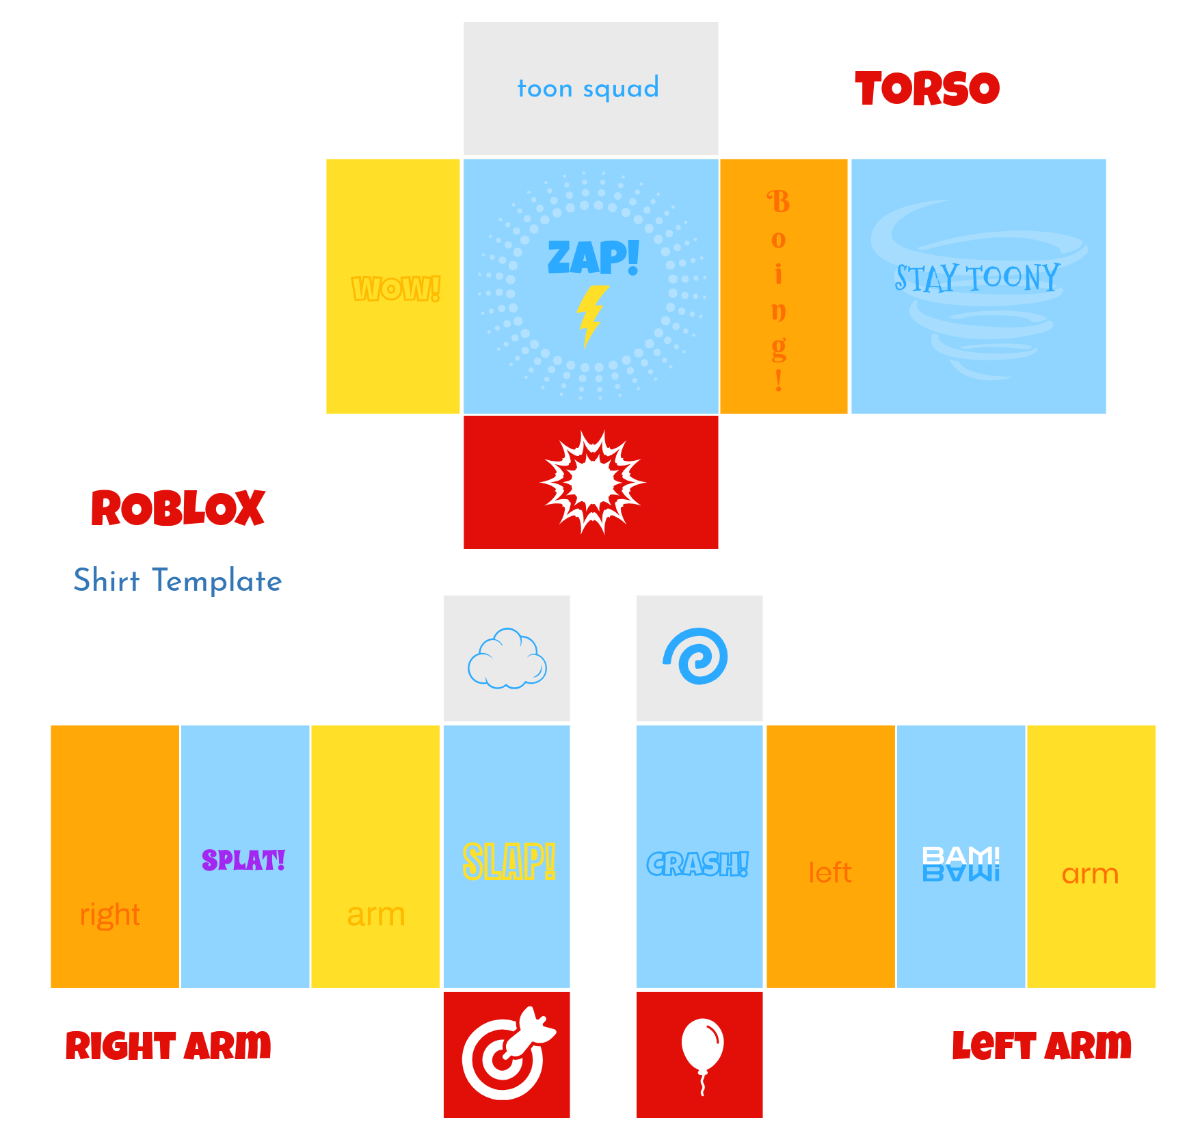
Understanding the Template
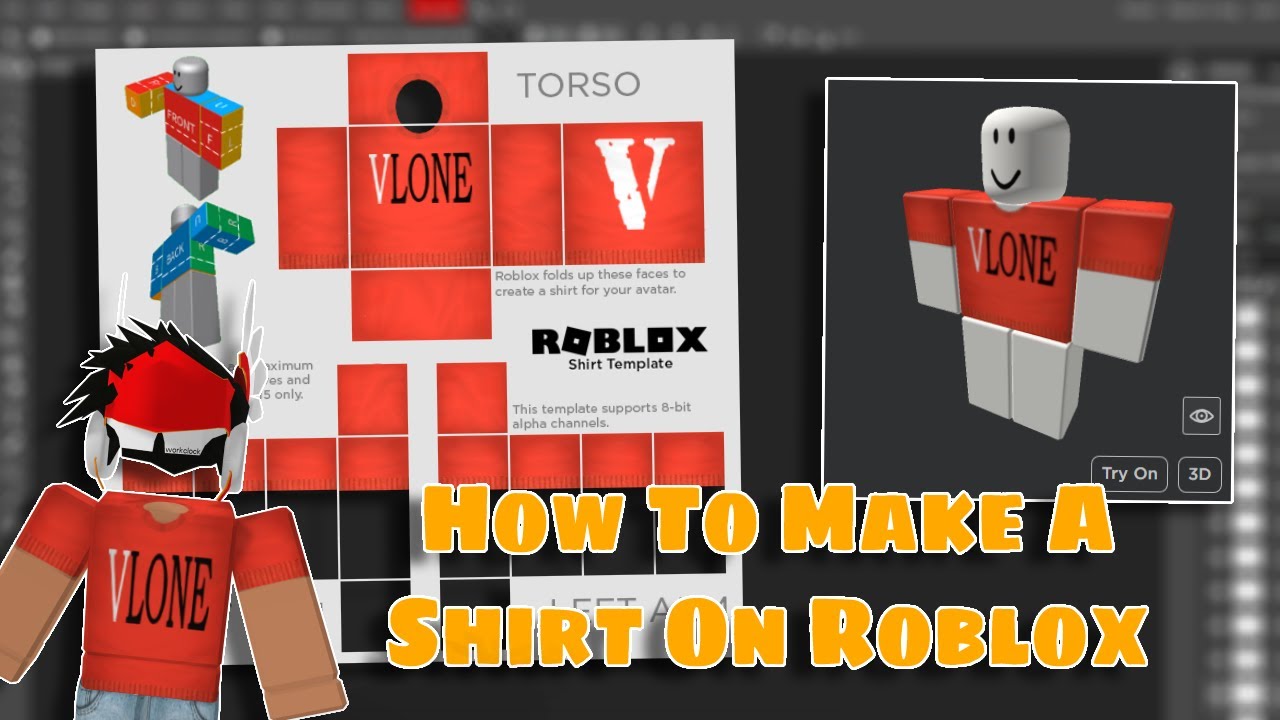
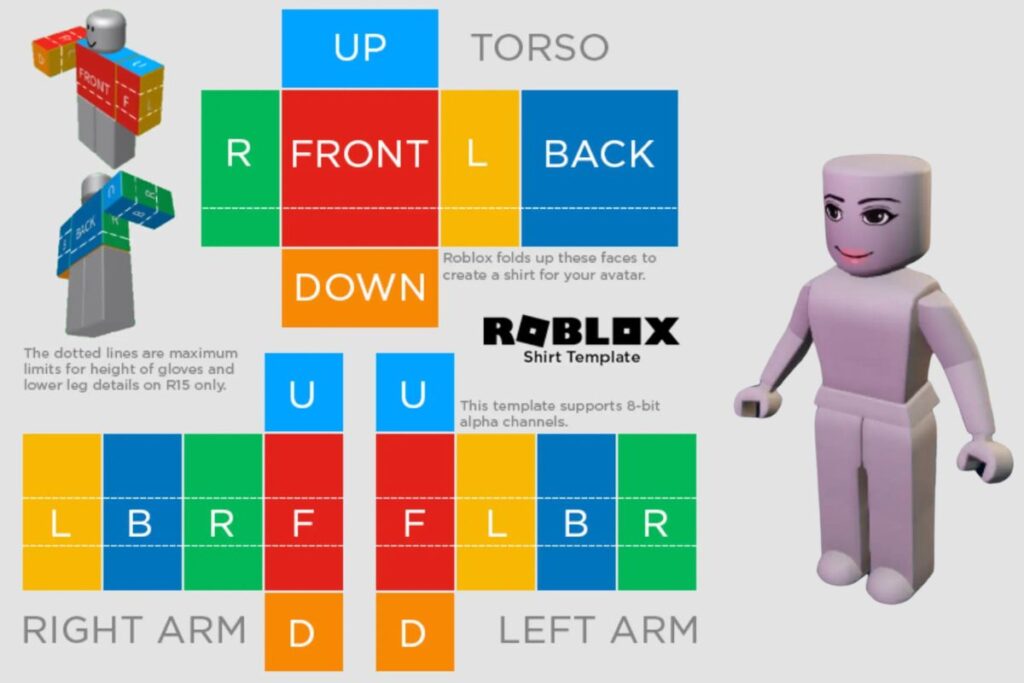
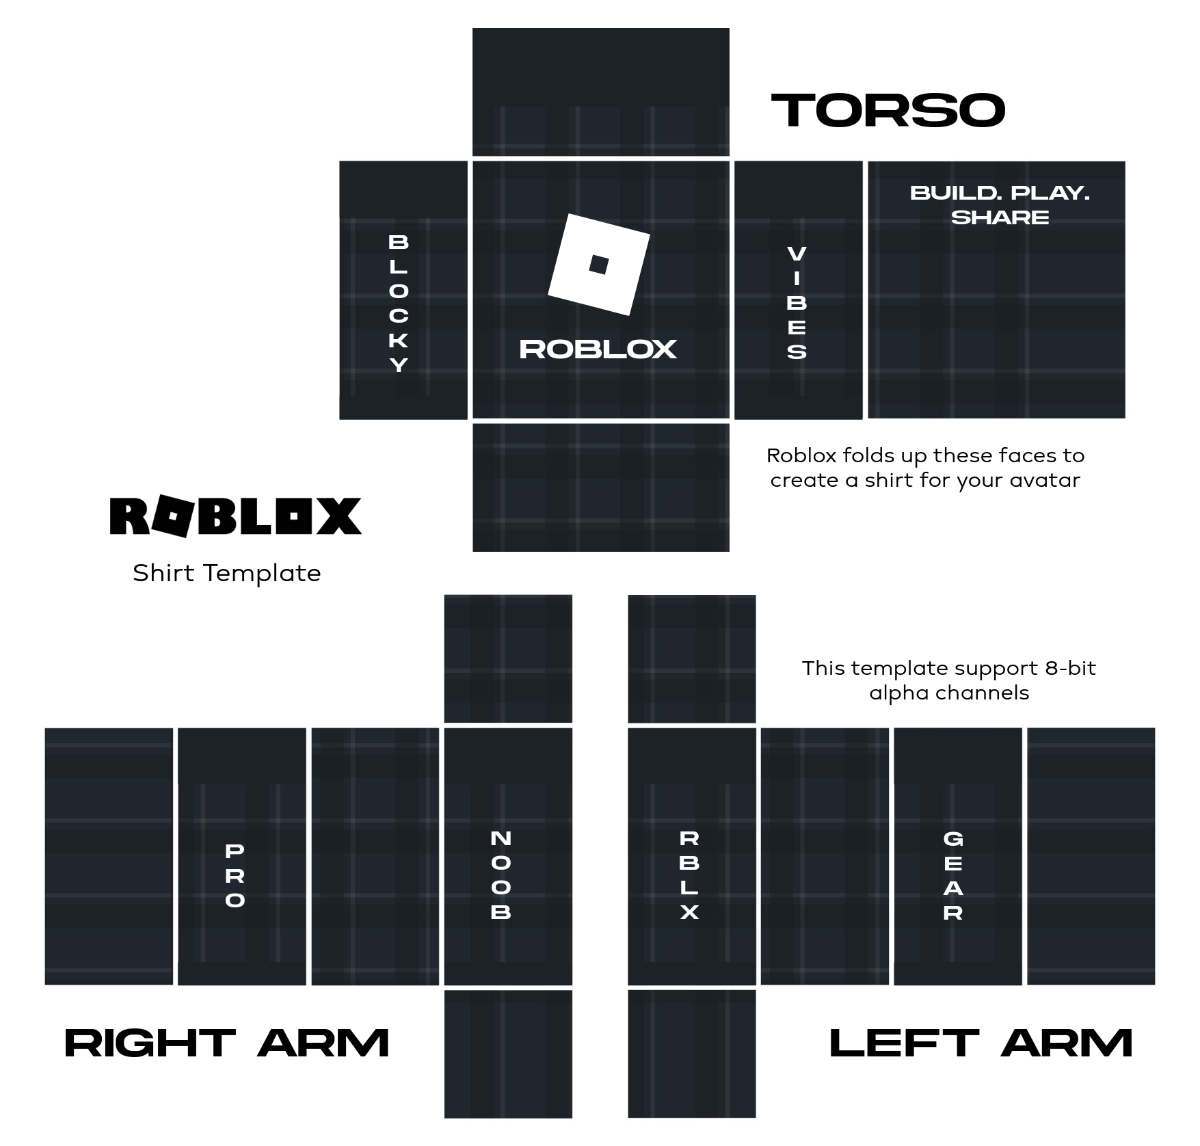
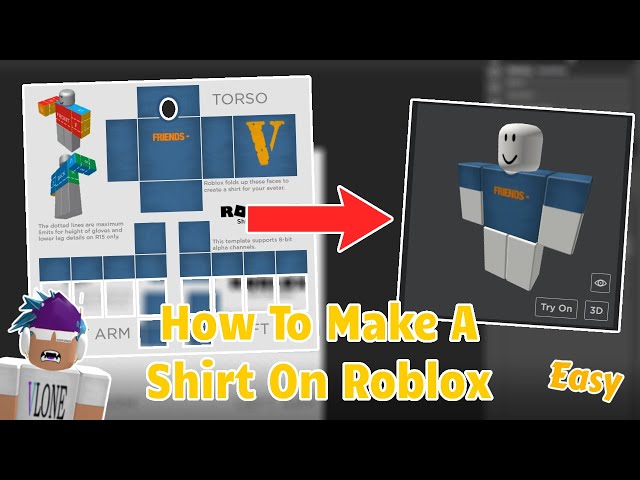
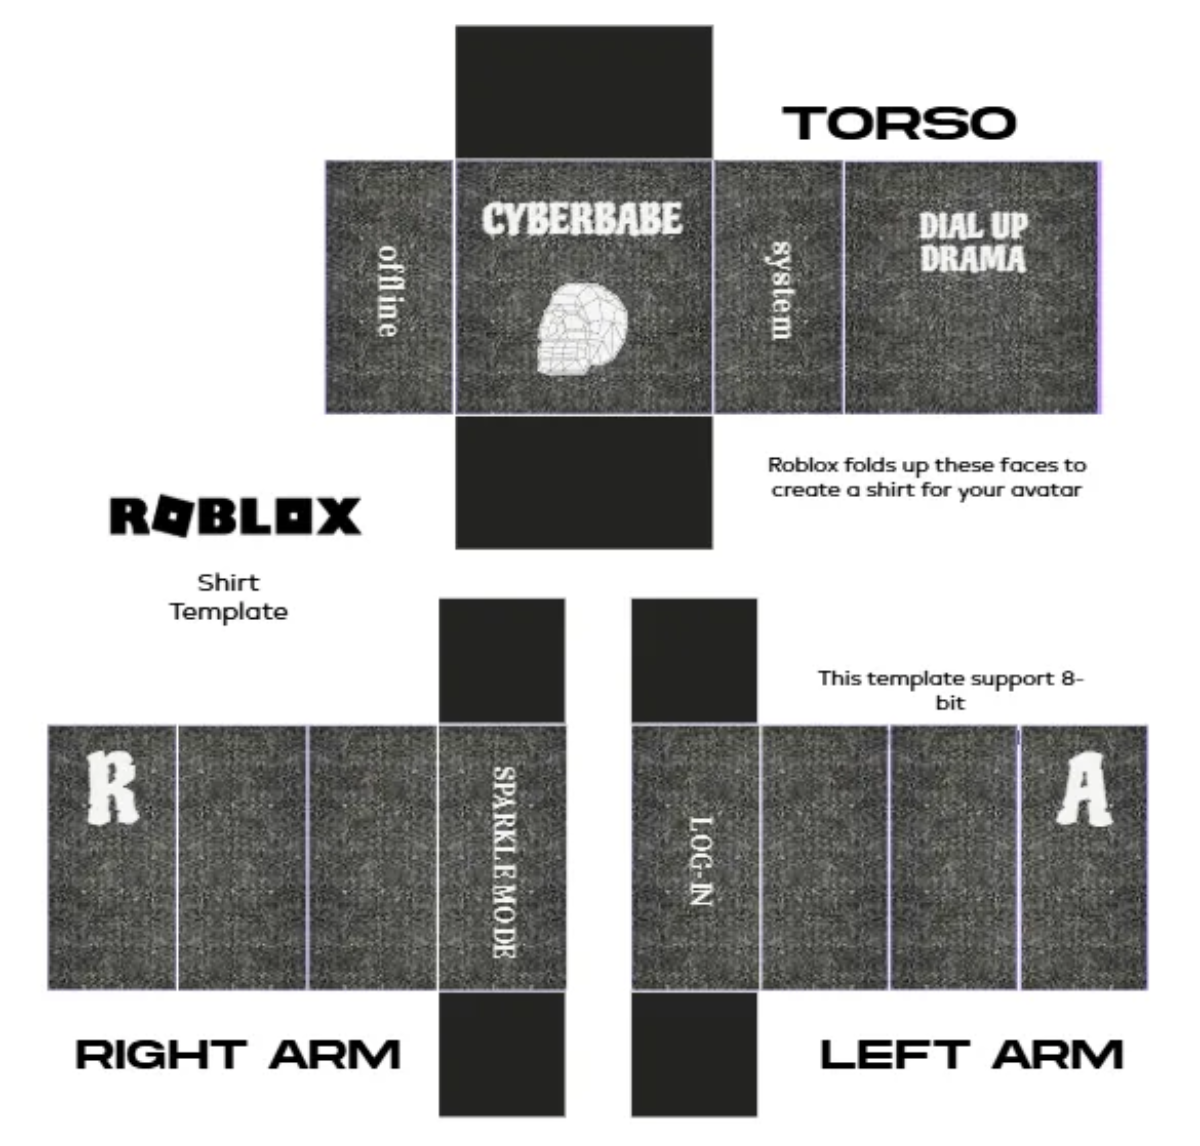
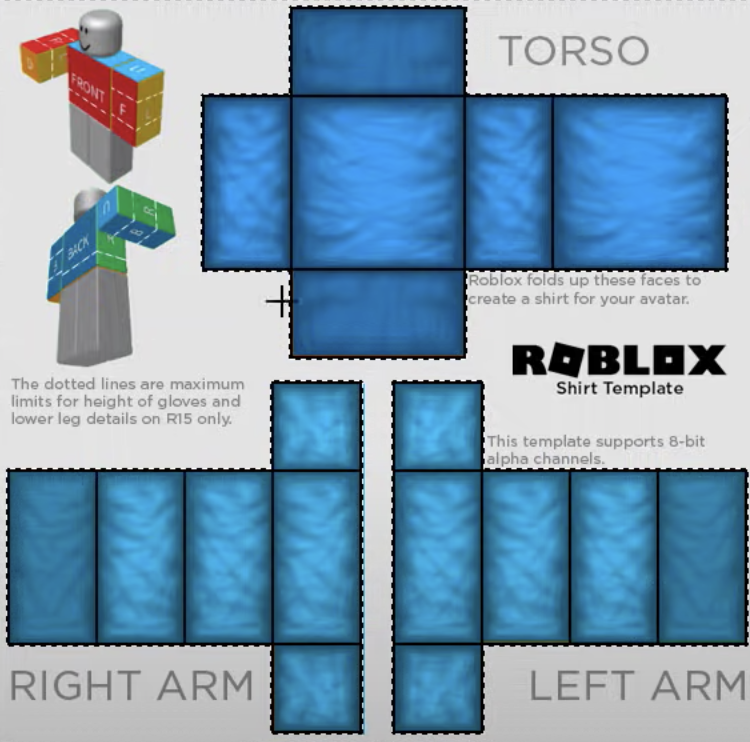
Roblox provides a specific template that every shirt design must adhere to. This template is a 2D layout that maps onto the 3D avatar model in the game. It shows you exactly where the front, back, sleeves, and sides of the shirt will appear.
You can usually find this template easily by doing a quick web search for "Roblox shirt template." It's often a transparent PNG file that you'll open in your chosen image editing program. Properly aligning your artwork with these sections is absolutely critical for your shirt to look correct on avatars.
Design Software Choices
You'll need some kind of image editing software to create your shirt design. Many creators start with free options like GIMP or Photopea, which offer robust features. For those with a bit more experience, programs like Adobe Photoshop or Illustrator are also popular choices.
The important thing is to pick software you're comfortable with and can use to manipulate images effectively. You'll be importing the template, layering your designs, and then exporting the final image. Knowing your software inside and out really makes the process smoother.
Uploading Your Masterpiece
Once your design is complete and you're proud of your work, the next step is getting it onto the Roblox platform. This part involves navigating the Creator Dashboard and ensuring your image meets all technical specifications. It's a fairly straightforward process if you know where to go.
Honestly, I know it can be a bit nerve-wracking the first time you upload. You just want it to work perfectly without any hiccups. But as long as you've followed the template and size guidelines, you should be good to go.
Meeting the Requirements
Before uploading, double-check your image. Roblox requires shirt images to be exactly 585 pixels wide by 559 pixels tall. If your image dimensions are off, the upload will likely fail. Make sure your design is saved as a PNG file with a transparent background.
Transparency is super important because it ensures that only your design appears on the avatar, not a big white or colored box. If your image isn't transparent in the right places, it won't look like an actual shirt. These small details really do make a big difference.
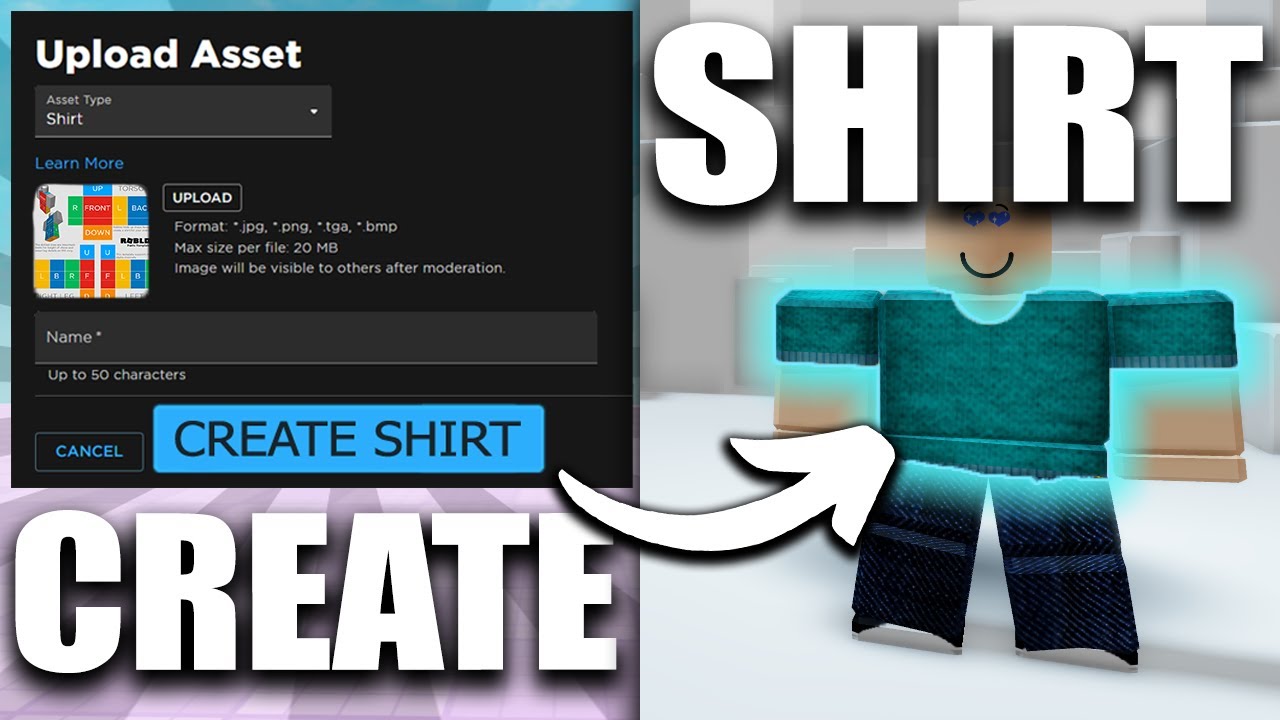
The Upload Process
To upload your shirt, head to the Roblox website and navigate to the "Create" section or your Creator Dashboard. Look for the "Shirts" option under "Creations." From there, you'll be able to upload your PNG file, give your shirt a name, and add a description. Remember, there's a small Robux fee to upload each shirt, typically 10 Robux.
After you upload, your shirt will go through a moderation process to ensure it complies with Roblox's Community Standards. This usually takes a little while, so don't fret if it doesn't appear immediately. It's just Roblox making sure everything is appropriate for the platform.
Selling Your Shirts on Roblox
If you're aiming to turn your creativity into Robux, selling your shirts is the next logical step. The Roblox Avatar Shop is a huge marketplace where millions of players browse for new clothing items. Getting your shirt listed correctly is key to making sales.
It's super exciting to see your designs available for others to purchase. You're not just creating for yourself anymore; you're contributing to the vast Roblox economy. And honestly, it feels pretty cool when you see someone wearing your design in-game!
Setting a Price
After your shirt passes moderation, you'll be able to set a price for it. You can choose any price, but typically, shirts sell for around 5-100 Robux. Keep in mind that Roblox takes a percentage of each sale, so you won't receive the full amount.
Think about what similar shirts are selling for and what you think your design is worth. A fair price can attract more buyers, especially if your design is unique and high-quality. It's a good idea to do some market research before settling on a number.
Robux Earnings
When someone purchases your shirt, the Robux will be credited to your account after a pending period. This waiting time is normal and ensures that transactions are legitimate. You can track your sales and pending Robux in your Creator Dashboard.
Building up a consistent income from selling shirts can take time and effort, but it's definitely achievable. The more unique and appealing designs you offer, the better your chances are of gaining a loyal customer base. So, keep creating and refining your style.
Troubleshooting Common Issues
Sometimes, things don't go exactly as planned. You might encounter issues like your shirt upload failing or your shirt getting stuck in a "pending" status for an unusually long time. Don't worry, these are common problems, and there are usually simple solutions.
I know it can be frustrating when your hard work seems to hit a roadblock. But honestly, most of these issues stem from minor technicalities that are easy to fix once you know what to look for. Let's resolve some of these common headaches together.
- Upload Failures: Most upload failures are due to incorrect image dimensions (not 585x559 pixels) or using a file format other than PNG. Double-check these specifications carefully.
- Pending Shirt: If your shirt is pending for more than a few days, it could be under manual review, or there might be a minor issue. Ensure your design adheres strictly to Roblox's community guidelines. Sometimes, simply re-uploading can resolve it.
- Transparency Issues: If your shirt has white boxes instead of transparent areas, your PNG wasn't saved correctly. Make sure you select the option to preserve transparency when saving your design from your image editor.
- Design Rejection: If your shirt is rejected, Roblox usually provides a reason. Review their content guidelines thoroughly to understand why and then adjust your design accordingly before re-uploading.
Remember, patience is key, especially when dealing with moderation times. Most issues can be resolved by carefully reviewing the requirements and guidelines. Does that make sense? What exactly are you trying to achieve with your shirt setup?
Designing Roblox shirts, using the official template, uploading clothing to Roblox, understanding Robux costs, selling shirts for profit, troubleshooting pending uploads, best practices for shirt creation, navigating the Creator Dashboard.
35


How To MAKE A SHIRT IN ROBLOX EASY METHOD YouTube . How To Make A Shirt On Roblox 2026 YouTube . Free AI Roblox Shirt Generator Free Roblox Shirt Maker Online Hoodie Roblox Shirt Template Edit Online . Roblox Shirt Template Your Guide To Custom Apparel Design A Roblox T Shirt Design Template Shown In The Image 1024x683 . How To Create Roblox Shirt Fast And Easy YouTube


Free Preppy Roblox Shirt Template To Edit Online Transparent Roblox Shirt Template Edit Online . Roblox How To Actually Make Setup Your Own Classic Tshirt On Roblox . Red Camo Roblox Shirt Shirt Template Dotted Line Create Shirts 8 . Free Roblox Classic Shirt Template To Edit Online Roblox Classic Shirt Template Edit Online . How To Make Your Own Shirt In Roblox YouTube


How To Make A Shirt In Roblox Step By Step Guide Sddefault . Free Roblox Shirt Templates To Edit Online Creative Roblox Shirt Game Template Edit Online . Shirt Template Roblox Prezibase Roblox Clothing Templates Shirt Download Design . Free Preppy Roblox Shirt Template To Edit Online Roblox Green Shirt Template Edit Online . Clothing Preview For Roblox Sell Your Roblox Avatar For Robux New Hq720


Gold Adidas Shirt Roblox Template Custom Roblox Game Birthday Shirt Roblox Gold Shirt Template Edit Online . Free Halloween Roblox Shirt Template To Edit Online Cartoon Roblox Shirt Design Template Edit Online . Free Cute Roblox Shirt Template To Edit Online Simple Camouflage Roblox Shirt Template Edit Online . Roblox Shirt Template Generator Nike Roblox Shirt Template Edit Online . Free Cool Roblox Shirt Template To Edit Online Roblox Lava Shirt Template Edit Online

What Is The Roblox Dirty Shirt Trend Impact Kawaii Roblox Shirt Template Edit Online . How To Create A Shirt In Roblox EASY 2024 Update YouTube . Free Printable Roblox Shirt Template To Edit Online Pink Roblox Shirt Template Edit Online . Free Cool Roblox Shirt Template To Edit Online Roblox Shirt Y2k Design Template Edit Online . What Will Roblox Look Like In 2026 Blog Graphics 26


How To Sell T Shirts In Roblox For Free H Ng D N Chi Ti T V D Hi U Roblox Shirt Template 750x742 . Roblox Shirt 2025 . How To Get Carnival Tickets In 99 Nights In The Forest Roblox Classic Clothing Shirts Pants.webp. Free Roblox Shirt Templates To Edit Online I Love Roblox Shirt Template Edit Online . Every Roblox Classic Shirt ID February 2026 Roblox ID Roblox Classic Shirt IDs


How To Make Roblox 2024 Custom T Shirts For FREE Easy Step By Step . How To Create A Roblox Shirt On Mobile 2025 Full Guide YouTube . Shirt ROBLOX Polytoria . Every Roblox Classic T Shirt ID February 2026 Roblox ID Roblox Classic T Shirt IDs . How To Make A Shirt In Roblox 2023 Update Create Your Own Roblox 4Cedp 6e5w